This beginner’s guide to identification of knapped flints and stone tools has been written by Barry Bishop and is one of a series of introductory guides published by the community archaeology network, Jigsaw.
The aim of this guide is to help in recognising flint tools and in distinguishing deliberately modified from naturally occurring rocks.
Why are Stone Tools Important?
-
- Humans are the only animals to regularly make tools and the way they do it varies across cultures. Studying the technology of making tools allows us to better understand ourselves and others.
- Stone tools provide some of the earliest evidence for what we might consider human behaviour and have been made more or less continuously since the first human-like ancestors appeared. Stone tools first appear in Africa around 3 million years ago and the earliest so far recognised in Britain, from Happisburgh in Norfolk, are nearly 1 million years old. Regular stone tool use continued thereafter until the Iron Age, around 2,000 years ago. They still continued to be made for specialist purposes; as strike-a-alights, for working shale and more recently as gunflints. Flint nodules continue to be knapped for decorative building stone and flint knapping remains a popular recreational pastime.
- Stone tools play a privileged role in archaeology as they are extremely durable and they survive through most circumstances. Palaeolithic tools have survived for hundreds of thousands of years, enduring repeated Ice Ages and being washed down rivers, but we can still pick them up, see how were made and say things about their makers. Even for more recent periods, the effects of weather and ploughing over thousands of years means more often than not stone tools are the only surviving evidence for where people were living and what they were doing.
- A further reason stone tools are significant for archaeologists is that they were made in vast quantities. A single episode of knapping can generate thousands of pieces; many millions of pieces of struck flint remain to be found, each capable of telling its own small part of the story of our past.
Working Stone
So there are lots of them, and they were made over a long period of time. But what can we do with them? The first thing we must do is to recognise them and distinguish them from natural background stone. Stone undoubtedly was and still is used in completely unmodified states – many people have used a stone as a hammer at some point if nothing else is available. But unless it has been visibly modified or we find them in an unusual context – piles of small rounded stones found near hillfort entrances for example, that may be a cache of slingstones – it is usually very difficult to be sure that a natural stone has been used if that use does not leave traces. In most cases we must look for signs that the stone has been intentionally modified, and this can occur in two main ways:
-
- Very coarse grained rock or rock with prominent bedding plains can be pecked into shaped by repeatedly pounding, removing small fragments and dust until it attains its desired shape. These can be recognized by the traces of wear to their surface and by evidence for their deliberate shaping.
- Finer grained rock, where it is possible to control the lines of fracture, can be flaked into shape – basically by hitting it to remove large lumps. Many types of rock can be fractured in this way but the best known is flint.
Once artefacts had been shaped, either by pecking or knapping, some were further modified by grinding and polishing; eventually this can achieve a mirror-like finish.
In East Anglia we do sometimes find imported stone, mostly from northern or western Britain and on rare occasions we might find stone such as Jadeitite that has come from as far as the Alps. However, massively outnumbering those and overwhelming used for ‘everyday’ tools in the region is flint which was worked by knapping.
Identification of Knapped Flint from Natural Pieces
Flint is very hard, and this means that its edges can be incredibly sharp and resistant to wear. But just as important is its structure. It is mostly a silicon dioxide, as is sandstone or glass, but it has what is known as a crypto-crystalline structure. It is crystalline, but the crystals are so small that they do not deflect any force waves that travel through. Therefore, with a lot of skill, and a bit of luck, it is possible to control how it fractures, making it possible to shape lumps of flint and detach flakes of predetermined shape and size. Unfortunately there are also natural processes that can cause flint to fracture and we must distinguish between pieces that have been knapped and those fractured naturally.
Essentially there are two ways that flint can fracture:
-
- Through thermal expansion and contraction: as with everything else, flint gets minutely bigger as it heats up and shrinks when it cools. Now this might not sound very destructive and the flint only changes shape very marginally, but over time this causes weaknesses in the stone – thermal flaws – to develop, and eventually it will break into two or more pieces. We should remember as well that in the past, during the Ice Ages, things were much cooler than now. At night flint on the surface would freeze very deeply, and then warm up quickly as the sun came out.
- Through mechanical application; basically if hit hard or enough pressure is exerted, the flint will break – this is known as percussive fracture.
Two things to note
-
- In nature, there are virtually no processes that can actually cause a piece of flint to be hit with sufficient force to cause it to break through percussive fracture. Some ‘accidental’ processes, such as ploughing, can break a flint through percussion. These can be confusing but the lack of ‘deliberate purpose’ or repetitive knapping will usually differentiate these from deliberately struck pieces.
- The two types of fracture, thermal and percussive, leave slightly different marks on the flints’ surfaces, and therefore it is possible to tell if a piece has been deliberately hit or has fractured naturally. The differences will be demonstrated below.
Thermal Fracture
With thermal fracture the break is caused very slowly, as the flint heats up or cools down. The break starts in the middle of the nodule, often around an impurity, and the line of fracture causes multiple concentric rings to form on the broken surface, that radiate out from this point.
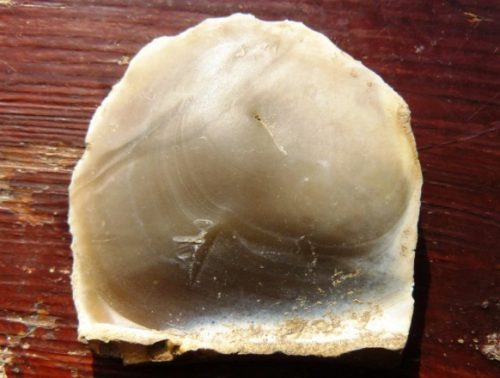
The image above shows a spall of flint that has split off a larger nodule through thermal contraction and expansion, a type commonly known as a ‘potlid’ spall. The point at which the fracture was initiated is an impurity and can be seen as a darker mark just above the centre of the flint, and rings, representing the progress of the fracture, can be seen to emanate from this to its edges.
This image shows a piece of flint with several thermal facets. Although in some ways it looks flaked, closer inspection shows all the rings developed from inside the flint and therefore could not have been caused by being hit.

Image Courtesy of Pre-Construct Archaeology
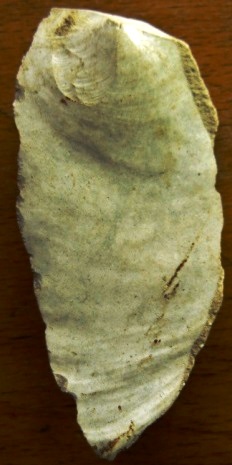
This illustration shows pieces of thermally fractured flint that were later struck and used as core tools during the Later Bronze Age. The natural thermal fractures can be seen as concentric rings whilst the deliberately struck scars have rings that start from the edges of the flint and radiate inwards. Their resemblance to some types of marine shells has led percussion fracture to often be termed ‘conchoidal’ (shell like) fracture.
Percussive Fracture
With percussive fracture, the initiation that causes the break to start happens suddenly and always from the outside – you simply cannot hit the inside of a piece of flint. This leaves a number of features or attributes that should be present on all struck flints. In reality they are not always easy to see on all pieces, and of course many struck flints are broken, so parts might be missing. However, with this knowledge and by looking at as many real struck pieces as possible, it does become easy to confidently differentiate humanly struck from naturally fractured flints.
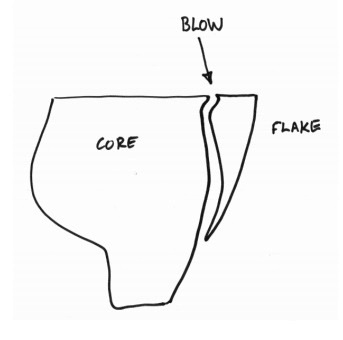
When a piece of flint, or core, is struck with sufficient force a fracture is initiated from where the blow lands and travels through it until it re-emerges on the surface elsewhere. The piece detached is called a flake. With skill, this line of fracture can be carefully controlled.
Percussion fracture can be achieved by three main ways, all of which leave slight variations on the flakes’ attributes:
-
- Hard Hammer percussion is when a flake is detached using a hammerstone that is of an equivalent or harder material to the flint. In East Anglia the most commonly used hammers were either other pieces of flint or cobbles of hardened sandstone that can be found in the region’s glacial deposits and river gravels.
- Soft Hammer percussion is where the hammer is softer than the flint. Most often used was antler but hard-wood billets and pieces of dense bone could also be used.
- Pressure Flaking involves not striking but applying increasing pressure to the edge of a piece of flint, usually with a bone or antler point, until eventually it snaps and a very thin spall is detached. It is mostly used as a means to shape and thin tools such as arrowheads and certain types of knives.
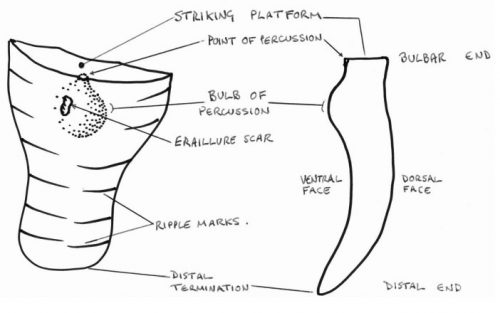
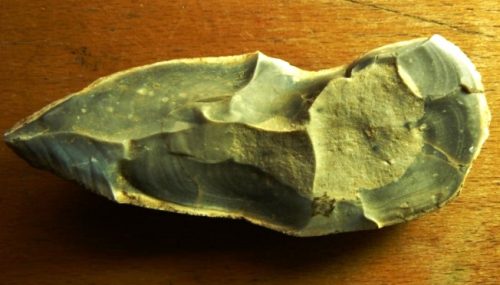
This image shows the principal attributes that can be seen on the ventral face (the inside bit that was attached to the core) of a flake. The cores will retain scars from where the flake has been detached which will show identical attributes, but of course in reverse!
-
- The Striking Platform. The break is started on the outside of the flint, which means that any humanly-struck flake must have a remnant of the surface of the core where the blow was struck. The angle between the striking platform and the ‘face’ of the core is crucial in determining how the flake will detach and how big and thick it is. This was therefore often modified, such as by faceting or edge-trimming, and this can give us clues to the date that the piece was made.
- The Point of Percussion is the exact spot where the blow fell and is caused by crushing to the surface. How prominent these are depends on the hardness of the hammer and the skill of the knapper.
- The Bulb of Percussion is a feature of fracture mechanics. Just below the point of percussion the fracture travels through the flint in a cone shape which quickly develops into a swelling, or bulb, and then diffuses out until it meets the edge of the core. The flake will therefore have a small cone-shaped feature and a swelling on its ventral face. Hard hammer percussion tends to result in pronounced bulbs, whilst the use of soft hammers often results in either a small and discrete hemispherical bulb or one that is barely perceptible.
- Ripple marks are similar to those seen on naturally fractured flint, but with humanly struck pieces they will always emanate from the striking platform, where the blow was struck
- Erallieur Scars are small flake scars often seen on a flake’s bulbs of percussion. The reasons for their formation are not fully understood although they are usually only present when hard hammers are used.
- The Distal Termination is the point where the fracture exits the core. They vary from being sharp (feathered) to rounded and blunt (hinged), depending on the force of the blow. The attributes of flakes are therefore a guide to whether a flake had been deliberately struck or not, but they can also tell us about how the knapping was conducted. By looking at the techniques of knapping it can be possible to date assemblages and infer both the levels of skill and the intensions of the knappers.
Dating of Flint Tool Assemblages
Dating flint assemblages is usually achieved in two main ways: If we are lucky we may find chronologically sensitive diagnostic pieces, or type fossils: these are implements that were only ever made during one period. Microliths, for example, appear to have only been made during the Mesolithic, and polished axes during the Neolithic. Arrowheads also changed in shape over time and therefore can be reasonably accurately dated.
However, there are only a small number of these types of tools and more often than not they are not present in an assemblage. We therefore have to rely on changes in the ways cores were worked and tools produced – the technology of an assemblage. Luckily for us there is an infinite way people can reduce a lump of flint and the methods people used changed over time. So what we do is record all of the attributes of an assemblage, not least the waste pieces, and try to reconstruct the ways the knappers dealt with their flint. In order to do this accurately we need as much of the waste as possible, so it is always worth keeping all of the struck flint from excavations or field surveys, not just the nice bits, it all adds to the story!
Identification of Knapped Flints – Further Reading
Hopefully this guide will help in identification of knapped flints, and differentiating natural flints from those that have been purposefully struck. For those who wish to further understand flint and knapping techniques the following manuals may be useful:
Andrefsky, W. 1998 – Lithics: macroscopic approaches to analysis. Cambridge Manuals in Archaeology. Cambridge University Press. Cambridge.
Kooyman, B.P. 2000 – Understanding Stone Tools and Archaeological Sites. University of Calgary Press. Calgary.
Shepherd, W. 1972 – Flint. Its Origins, Properties and Uses. Faber and Faber. London.
Whittaker, J.C. 1994 – Flintknapping: making and understanding stone tools. University of Texas Press. Austin.
Very in-depth accounts include the following:
Andrefsky, W. (Ed.) 2001 Lithic Debitage: context, form and meaning. University of Utah Press. Salt Lake City.
Andrefsky, W. (Ed.) 2008 Lithic Technology: measures of production, use and curation. Cambridge University Press. Cambridge.
Andrefsky, W. 1994 Raw-Material Availability and the Organization of Technology. American Antiquity 59 (1), 21–34.
Andrefsky, W. The Analysis of Stone Tool Procurement, Production and Maintenance. Journal of Archaeological Research 17, 65–103.
Cotterell, B. and Kamminga, J. 1979 – The Mechanics of Flaking. In: B. Hayden (Ed.) Lithic Use. Wear Analysis, 97–112. Academic Press. New York.
Cotterell, B. and Kamminga, J. 1987 – The Formation of Flakes. American Antiquity 52, 675–708.
Odell, G.H. 2000 – Stone Tool Research at the End of the Millennium: procurement and technology. Journal of Archaeological Research 8 (4), 269–331.
Odell, G.H. 2001 – Stone Tool Research at the End of the Millennium: classification, function and behaviour. Journal of Archaeological Research 9 (1), 45–100.
Odell, G.H. 2004 – Lithic Analysis (Manuals in Method, Theory and Technique). Springer. New York.
Ohnuma, K and Bergman, C. 1982 – Experimental Studies in the Determination of Flaking Mode. Bulletin of the Institute of Archaeology 19, 161– 170.
Pelcin, A. W. 1997a – The Effect of Indentor Type on Flake Attributes: evidence from a controlled experiment. Journal of Archaeological Science 24, 613–621.
Pelcin, A. W. 1997b – The Effect of Core Surface Morphology on Flake Attributes: evidence from a controlled experiment. Journal of Archaeological Science 24, 749–756.
Pelcin, A. W. 1997c – The Formation of Flakes: the role of platform thickness and exterior platform angle in the production of flake initiations and terminations. Journal of Archaeological Science 24, 1107–1113.
Speth, J.D. 1972 – Mechanical Basis of Percussion Flaking. American Antiquity 37 (1), 34–60.
This step by step guide to archaeological techniques is one of a series prepared by Jigsaw – a network of Cambridgeshire groups working alongside Oxford Archaeology East. The guides are available for download from the Jigsaw Website. Copyright in these guides belongs to Jigsaw and the authors.

