Test-pitting is a great way to learn basic archaeological excavation techniques on a small scale. It is also used to identify the growth and contraction of a settlement through time. It is relatively cheap to conduct, but a realistic budget needs to be in place for finds identification.
Before you start
- Write down your research objectives: what you want to find out.
- Find a location for your test pit, e.g. a back garden. You may need to advertise to find willing garden owners.
- Ensure you have adequate insurance for all your activities and participants. Make a Risk Assessment for your activities, and create a Health and Safety Policy for your society, if you don’t already have one. Steel-toe capped boots should be worn when using a mattock.
- Consider who will be involved and how many participants. Young people will need to be accompanied by an adult. Don’t aim to excavate more than five test pits if this is the first time you have testpitted. Each test pit can easily occupy three or four participants. Decide who is in charge of the project.
- Once you have fixed a date, please notify Cambridgeshire Historic Environment Team (HET) and request an Event Cambridgeshire (ECB) number by completing the ‘about to start a research project’ section of the HER Report Form: http://surveys.thehumanjourney.net/index.php?sid=12258&;newtest=Y&lang=en
Equipment – for each test pit
- 1 shovel 1 bucket
- 1 mattock 2 sieves
- 2 trowels 120cm string
- 1 de-turfing spade 4 grid pegs/nails
- plastic sheeting/tarpaulin 2 x 30m tapes
- 2 x hand held tape measures recording sheets
- photographic kit finds labels
- finds bags newspaper
- handheld GPS (if available) finds trays
- CAT scanner line level
- compass
- permatrace/tracing paper
- stationery: 6H pencil, eraser, biro, Artline pen
When to do it
Testpitting can be done at any time of year, although there is no point excavating when the ground is frozen or rock hard! In hot sun, you may wish to excavate under a gazebo, and remember to cover up and use a high factor sun screen.
Preparing your paperwork
Decide on a recording system for your testpitting project.
- Give your project a site code e.g. CAMTP14 for CAMbridge Test Pits 2014.
- Decide on the number of test pits to excavate. Each test pit can be called ‘TP1’, ‘TP2’ etc.
- Decide the numbering system you will use for each layer of soil you excavate, e.g. (601) could be used to represent test pit 6, context 1. The round brackets mean that this context is a fill or layer of soil.
Setting up your first test pit
- Choose a location for your test pit. Landowners may provide information about previous structures or dumping on the site. It is inadvisable to excavate through gravel paths and drives, or through modern building material dumps. Use a CAT scanner to check there aren’t any services (pipes, electricity wires etc.). Keep an eye out for asbestos, and if present, avoid the area and do not excavate.
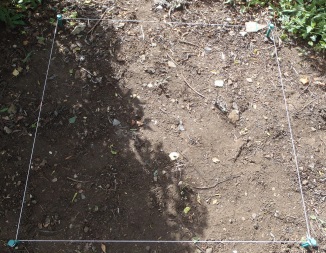
- Mark out your 1m x 1m test pit using measuring tapes. The hypotenuse (diagonal) of a 1m square is 1.41m; use this to find a perfect right angle. Double check your right angles by using the corner of this guide. Mark the edges of your testpit using string and nails/grid pegs.
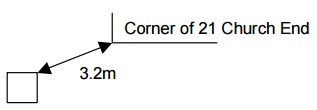
- Record the location of your test pit using a GPS, if you have one. Draw a plan of the location of your test pit on gridded permatrace at a scale of 1:50 (whereby a 1cm square represents 0.5m). Using the 30m tapes, measure the distance from your test pit to the nearest permanent structure which could be found on an Ordnance Survey map, e.g. the corner of a building or a road (see illustration). Ideally measure the distance from two fixed points, e.g. two corners of a building, or the corner of a building and a road or wall.

Excavating your first layer
- Spread out your tarpaulin about 1m away from the closest side of the test pit.
- Remove the turf layer of your test pit (if applicable). Use a sharp spade or deturfing tool to cut round your testpit, and cut squares or roll up the turf. Place the turf on the tarpaulin, at the furthest point away from the test pit. Try not to remove too much soil with the turf.
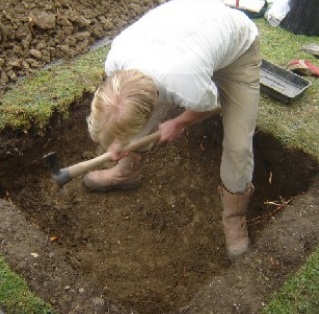
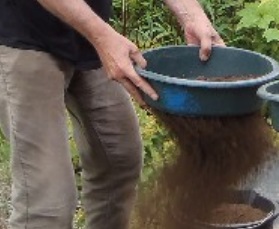
- Remove soil from your test pit using a mattock, shovel and trowel, shovelling your spoil (excavated soil) on to the tarpaulin. Once your test pit edges are clearly defined, remove the string, as this can be a trip hazard.
- Use a sieve to sieve all the spoil on the spoil heap. Separate your sieved spoil from your unsieved to avoid sieving the same spoil twice!
- Place any finds into a finds tray. Write a finds label for these finds with the site code, test pit number, and context number, e.g. CAMTP14, TP6 (601).
- When you uncover a second layer of soil (identified by a different colour or texture), remove all the remaining soil of the first layer using a trowel. Straighten the sides of your testpit using a spade or trowel. You have just excavated your first archaeological context: the topsoil.
Recording your first layer
Stop excavating and complete a ‘Test pit recording sheet for a layer/fill’ for this context.
- Enter the site code, testpit number and context number as below.
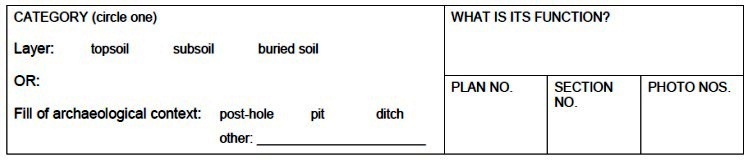
- For Category select ‘topsoil’. For Function write e.g. ‘garden soil’ or ‘plough soil’ (as applicable). Leave ‘Plan no.’, ‘Section No.’ and ‘Photo Nos.’ blank for the moment.
- Length = 1m, Width = 1m. Measure the depth using a handheld tape measure, and write in metres. For ‘Environmental Sample Nos.’ and ‘Number of Associated Cut’ write N/A.
- Colour: trying to categorise the colour of soil is difficult if you are new to archaeology. Think of the main colour of the soil, e.g. grey or brown, and then think what shade it is, e.g. reddish grey or yellowish grey, and then whether it is light or dark.
- Composition: can you roll the soil into a ball? If so, it could be silt. Can you fold the soil into a U-shape? If so, it could be clay. Does the soil contain big particles that don’t stick together and may be red or orange in colour? If so, it could be sand. Soil is rarely of only one type, so describe the soil as ‘silty clay’ or ‘clayey silt’, placing the main soil component at the end.
- Inclusions: this means ‘has it got any stones etc. in it?’.For ‘Is it cut by anything?’ write ‘N/A’ for this layer.
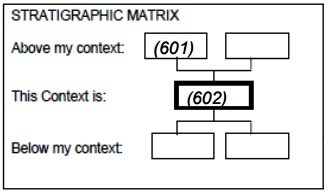
- Stratigraphic Matrix: this is a diagram to show how the archaeological layers relate to each other. Write your context number into the box next to ‘This Context is:’. Leave the other boxes blank for the moment.
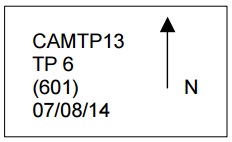
- All other areas of the ‘Test pit recording sheet for a layer/fill’ sheet should be self-explanatory. Now take a photograph of your test pit. Place a photo board with the site code, test pit number, context number, date and north arrow on it next to your test pit (see picture). Ensure the finds from this context have a finds label, and place them in a finds bag.

Excavating your second layer
Most test pits contain two contexts/layers of soil: the topsoil (context 1) and the subsoil (context 2). The subsoil is often (but not always) a lighter colour than the topsoil.
It is unlikely that your test pit only has one context/layer above ‘natural’ or the first layer of undisturbed geology, but this does sometimes happen. ‘Natural’ can be pure clay, chalk or sandstone; if the soil feels homogenous and you haven’t found an artefact for the past few centimetres, chances are you are now excavating ‘natural’ geology. If so, stop digging.
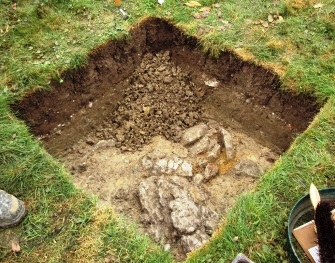
Most people, however, will still need to remove a fair quantity of soil – the subsoil – before they hit the ‘natural’. Keep digging; it becomes harder to mattock the deeper you go, so do take care of yourself and others around you. Make sure you keep the sides of your test pit straight, using a spade or trowel. At some point you will hit a soil colour and texture which feels different to what you are currently digging. For example, in the picture you can see the clear colour difference between the topsoil and subsoil in the vertical profile, and the colour difference between the subsoil and the natural being uncovered. Clean off the remaining soil using a trowel and straighten the sides of the test pit so they are perfectly vertical.
Recording your second layer
Now complete a ‘Test pit recording sheet for a layer/fill’ sheet for the second layer (context 2), as below. If the context number for the first layer (topsoil) of TP6 was (601), the number for the second layer (subsoil) will be (602).

Complete the form in the same manner as for the first layer, taking into account the differences between this layer and the one above, such as colour, composition and depth. Your stratigraphic matrix should look like the one below. Return to your first layer/fill sheet and add (602) to one of the boxes for ‘Below my context’.
Take a photograph of this excavated layer, write a finds label for the finds, and place them in a separate finds bag to layer 1.
Excavating further layers/contexts, or archaeological features
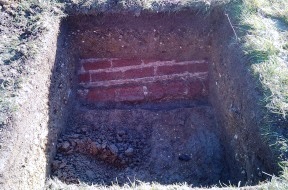
If you believe you haven’t hit natural yet, continue excavating till you hit a colour change in the soil. Occasionally you will uncover layers of stones/cobbles; treat these as you would layers of soil but note whether you think this could be a floor surface and take plenty of photographs. Sometimes you uncover masonry such as a brick floor, or a culvert (see picture below). In this case, complete a ‘layer/fill’ sheet and take plenty of photographs. Repeat this process until you hit ‘natural’.
Occasionally you will uncover archaeological features such as pits and postholes. In this case, please refer to our separate ‘Guide to Excavating Archaeological Features’ and complete the relevant context fill and cut sheets.
Section Drawing
A test pit section drawing is a drawing of one of the sides (vertical profiles) of the test pit. This provides a cross-section of the layers, and aids interpretation of the test pit.
- Choose a side of the test pit in which the layers are clearly defined and are representative of the whole test pit. You may need to ‘clean’ the profile with a trowel to see the layers more clearly.
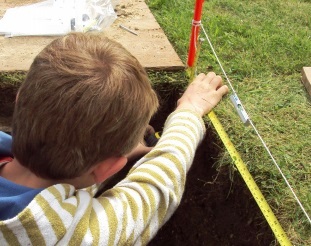
- Erect a string line above the chosen side of the test pit using a string and nails/tent pegs (see right). Hang a line level from the string to ensure it is perfectly level. You will be measuring from the string, since the ground surface may not be perfectly level. Stretch a hand tape between the two nails.
- Using a pencil, write the site code, test pit number, date and your initials on the permatrace/tracing film, as well as whether it is the north, south, east or west ‘wall’ of the test pit. Give your section drawing a number e.g. ‘6’ for TP 6, and write this on the permatrace/tracing paper and on your layer/fill sheets for the test pit.
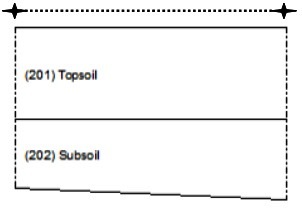
- Use a scale of 1:10 for section drawings (each 1cm on the permatrace = 10cm real life). Draw your horizontal string line on your plan (see dotted line, right), and mark positions of the nails. At 10cm intervals along the string line, measure down from the string line to the ground surface. Mark these points on your plan. Then measure each layer from the string line until you have drawn all your points, and your plan looks like the plan – note that the string line has been rubbed out after the drawing was finished. The dot/dash lines mean ‘limit of excavation’.
- If one of the vertical profiles is significantly different to the others or contains an archaeological feature, create another section drawing for this face.
Backfilling
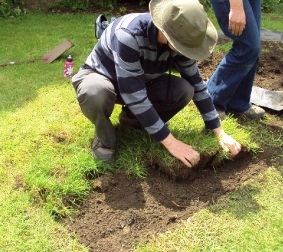
Shovel the soil into the hole, being careful to ensure soil goes into the corners. Try to backfill subsoil first, and finish off with topsoil. Walking/jumping on it will help the soil to settle, but ensure you don’t do this too much or too little or the test pit will show either as a bulge or hollow when the turf is reapplied. Once all the soil is in the hole, position the turf on the top of the test pit. If you have a stiff brush, sweep excess soil off the turf.
Congratulations: you have now completed your first test pit!
This step by step guide to archaeological techniques is one of a series prepared by Jigsaw – a network of Cambridgeshire groups working alongside Oxford Archaeology East. The guides are available for download from the Jigsaw Website. Copyright in these guides belongs to Jigsaw and the authors.

